A few weeks ago I was contacted by a long standing follower of our blog. The subject was about whether we wanted to exhibit Cliddesden at the Farnham and District MRC Exhibition 2013. This is a show I have been to over the last couple of years, as a visitor, and I have wondered if Cliddesden would be a good layout to show. In fact it's the first exhibition we went to to get inspiration and supplies for Cliddesden, so it only seems fitting.
We have never exhibited before, and there's a bit of work to do to get the railway layout ready for the show. Well, we have 10 months to work that all out! Keep your eyes open for blog posts about exhibiting your layout, as we learn ourselves.
So, if you want to see Cliddesden close up, we'll be coming to a town near you in 2013...
Well, Aldershot at least ...
Here's to 2013. Happy New Year
ED
Monday, 31 December 2012
Sunday, 2 December 2012
Cliddesden in Winter
Take a look at the front cover at http://www.amodelrailway.co.uk/, It's a simulated picture of how Cliddesden might have looked during winter. There's also a little section on the site about our little railway as well. The site is worth a read!
Happy Christmas
Ed
Happy Christmas
Ed
Monday, 26 November 2012
Photograph Series - Final Part (for now)
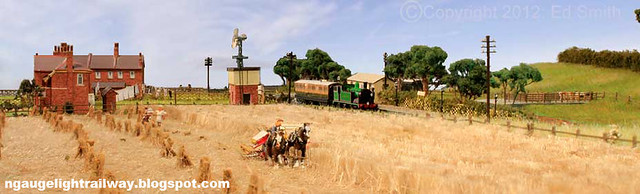
Everything you see in the photo, apart from the sky , is all "real" and part of the model railway, mostly scratch built and scaled in n-gauge; (approx)2mm:1ft.
Here we see a view looking over the farmers wheat field towards Cliddesden Station. The local farmer is reaping the field with his Mccomick reaper, and 2 horses. Women from the Women's National Land Services Corps are following to upend the bundles to form stooks to help dry the grain.
Shot with a Canon EOS 550D.
Ed
Monday, 19 November 2012
Photograph Series - Part 3
Here we see a view looking over the railway servants cottages and the station masters back garden, looking onto Cliddesden station. A freight train has just departed the station, and Alfred Vince (station porter) is pushing the station barrow with the coffin and the grieving father in tow along station road . Probably on their way to the church in the village.
Shot with a Canon EOS 550D.
Ed
Monday, 12 November 2012
Photograph Series - Part 2
Everything you see in the photo, apart from the sky, is all "real" and part of the model railway, mostly scratch built and scaled in n-gauge; (approx)2mm:1ft.
Here we see the back of Cliddesden station, and the sidings. The cattle are in the cattle dock, waiting for the next wagon to arrive.
Shot with a Canon EOS 550D.
Ed
Sunday, 11 November 2012
Remembrance

Our model railway is set in August 1916. One month after the battle commenced and here we have a peaceful rural scene (blog header) almost oblivious to the events of war. It makes our creative effort seem frivolous by comparison. But think again because much of the bad things going on abroad was not widely reported. Whilst creating this rural scene in the heart of the English countryside we were vaguely aware of a war in progress elsewhere but probably like the people living at home in the time not fully in tune with the horror of it. It was only when families and communities learnt of the massive losses in The Somme that a sense of shock and realisation pervaded the nation.
A reminder that life is not quite normal on our model railway is the Women's National Land Service Corps assisting with the harvest, covering for the men sent overseas. Other influences on home life at this time were the requisition of horses for use in the war. Our farmer here is fortunate to still have two horses to pull his reaper. Some farmers were only allowed one horse for the entire farm. Later in 1917 with the U boats decimating the Atlantic convoys spare land was given over to allotments and agriculture to boost home food production. Not a big impact here yet but plenty of unused land available around the station complex.
David
Monday, 5 November 2012
Photograph Series - Part 1
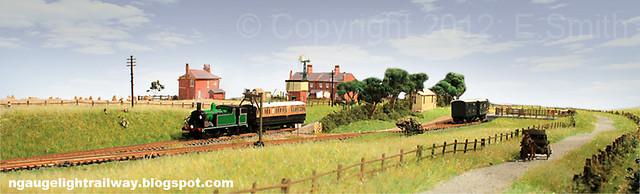
Everything you see in the photo, apart from the sky and smoke from the engine, is all "real" and part of the model railway, mostly scratch built and scaled in n-gauge; (approx)2mm:1ft.
Here we see the LSWR O2 (M7 in our case as no r.t.r), leaving Cliddesden station with LSWR 48' Brake Lav. Tri-Comp. I suspect very few people are on-board It's 1916, war has started, and the line is about to close.
Shot with a Canon EOS 550D.
Ed
Sunday, 28 October 2012
Raising The Bar
With the scenic details finished the question is what next? Well, we can correct errors, add details and cameo scenes almost at infinitum.
Extra details on a small layout sustain visitors viewing interest and it is heart warming for us to hear returning visitors say "Is that new?", when in fact a small detail they spotted had always been there! However, we should not over do it to the point where realism is compromised or it looks cluttered.
There is one scene we have not presented in this Blog so far that has been there from the early days and that is the railway staff cricket pitch. This has its own story based on fact but that will have to wait for another day to be told.
Some new details being discussed include more wild flowers, scratch built LSWR rolling stock, a train conveying Thornycroft J class trucks destined for France in WW1 (although whether or not they came this way is questionable, despite the factory being just up the line) and to move the layout forward 8 years to depict the station and rolling stock in Southern Railway livery. If we were starting again we would make the station platform and its tree line a replaceable module so that a SR version could be swapped in. Things that would be different include taller trees, SR station name boards, wire fence, SR staff and more vegetation. Currently, only the station building can be easily swapped for a SR green version.
One error that has just been corrected is the level crossing gate that was made too low and depicted 5 bars instead of 6. But, studying the real Cliddesden gate since remaking the model I noted it has 7 bars! I have seen pictures of other LSWR gates with 6 bars so, I'll not be changing it again. At least the height looks correct.

David
Extra details on a small layout sustain visitors viewing interest and it is heart warming for us to hear returning visitors say "Is that new?", when in fact a small detail they spotted had always been there! However, we should not over do it to the point where realism is compromised or it looks cluttered.
There is one scene we have not presented in this Blog so far that has been there from the early days and that is the railway staff cricket pitch. This has its own story based on fact but that will have to wait for another day to be told.
Some new details being discussed include more wild flowers, scratch built LSWR rolling stock, a train conveying Thornycroft J class trucks destined for France in WW1 (although whether or not they came this way is questionable, despite the factory being just up the line) and to move the layout forward 8 years to depict the station and rolling stock in Southern Railway livery. If we were starting again we would make the station platform and its tree line a replaceable module so that a SR version could be swapped in. Things that would be different include taller trees, SR station name boards, wire fence, SR staff and more vegetation. Currently, only the station building can be easily swapped for a SR green version.
One error that has just been corrected is the level crossing gate that was made too low and depicted 5 bars instead of 6. But, studying the real Cliddesden gate since remaking the model I noted it has 7 bars! I have seen pictures of other LSWR gates with 6 bars so, I'll not be changing it again. At least the height looks correct.
Spot the Difference

David
Wednesday, 24 October 2012
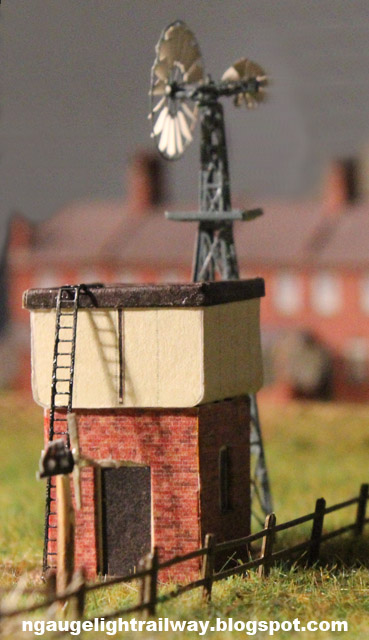
Ladders
A few more realistic details added to the model... In this case adding a few ladders in appropriate factual locations, according to photos in "The Book". The most obvious one was adding a ladder to the water tower, it was quite interesting to pick up the detail of the shadow generated by it on our model. A less obvious place where a ladder was spotted in one of the photos was, a step ladder propped up against the wall of the station building, behind the open gate (can you see it).


We used scalelink's n gauge ladder brass fret, painted hambro black. It's supplied as a set of 6, so we got to think of some more realistic interesting places to put the rest.
Ed

We used scalelink's n gauge ladder brass fret, painted hambro black. It's supplied as a set of 6, so we got to think of some more realistic interesting places to put the rest.
Ed
Monday, 22 October 2012
n Gauge Loco Crew
It's bad enough that our little engine does not emit smoke and steam but to be conveying passengers and goods without a footplate crew is down right inexcusable!
I selected the loco crew from the FLEETLINE range. This is very good value for money as we get two sets of people in 4 different poses. Some photos from LSWR days show the driver wearing a protective over jacket, which I believe to be a very light blue.

We wanted the crew to be removable from the cab because there is a crazy idea of fitting a DCC chip at some point and we wondered if the cab void would be needed for it. So, the solution was to fix the crew to a thin piece of brass such that the assembly could be slid into the cab between the hand rails and held in place with double sided tape. This can be prised out without too much difficulty.
Virtually impossible to discern any detail of the crew once installed so if the pose or position of them is wrong then it don't matter. At least it is obvious the footplate is now occupied.

To finish the loco fittings diamond route indicator boards were fitted to the front. These are pieces of double sided tape with the protective layer retained. The sticky side holds it to the body. A bit fragile but wanted to be able to remove them without damaging the loco in the future, if necessary.

I selected the loco crew from the FLEETLINE range. This is very good value for money as we get two sets of people in 4 different poses. Some photos from LSWR days show the driver wearing a protective over jacket, which I believe to be a very light blue.
We wanted the crew to be removable from the cab because there is a crazy idea of fitting a DCC chip at some point and we wondered if the cab void would be needed for it. So, the solution was to fix the crew to a thin piece of brass such that the assembly could be slid into the cab between the hand rails and held in place with double sided tape. This can be prised out without too much difficulty.
Virtually impossible to discern any detail of the crew once installed so if the pose or position of them is wrong then it don't matter. At least it is obvious the footplate is now occupied.
I'd lke to know what year diamonds were changed to circles.
David
Sunday, 21 October 2012
The Alton Spur
The Basingstoke Station, in N gauge, was on show at the 38th Farnham Expo. This was off interest to us, as it's our local mainline station and it's one end of where the Basingstoke and Alton light railway terminated. As the model is set in the 1960's the Basingstoke and Alton line had long gone, but here we see the line where it got cut off (on the far left hand side). Read more about the expo here
 Next passenger stop would have been Cliddesden, after passing the Thornycroft car factory which was also connected to the Basingstoke and Alton line.
Ed

Ed
Friday, 19 October 2012
LSWR Brake Van Part 5
Shock, horror and panic over.
Having coupled the Brake Van on to its train I noticed that the height of it was a good deal less than other box vans. Had I got the height wrong somehow? Checking the dimensions with the drawing revealed it to be correct.

The photo below shows the complete train from the normal the viewing distance. You may wonder why there are GW trucks in LSWR territory. Well the movement of goods between territories resulted in such events and the foreigners were often held and used for local deliveries eventually finding there way back to home ground. The other reason of course is a lack of LSWR r-t-r trucks from the trade!

Might be worth mentioning that the limit on train length for this line was initially set at ten loaded wagons (or 15 empty wagons) and three 4 wheeled passenger coaches. I wonder if a mixed train of this length every worked the line since it was a quiet back water with little traffic demand.
David
Thursday, 18 October 2012
LSWR Brake Van Part 4

The prototype shows the handrails painted white but I like the natural brass colour of the wire.
Stove pipe is a piece of wire and the three lanterns on the rear are made from balsa wood. I'm no expert on their use but from what I have read the white lantern signifies the train is complete. The black lanterns fitted on the outside of the door pillars identify this as an unfitted train, which means vacuum operated brakes are not fitted. These two lanterns show red lenses to the rear and clear to the front so that the driver can look out of his cab to see the lanterns thereby checking that the train is complete with the guard van in tow.
To Part 5.
To Part 1.
David
Wednesday, 17 October 2012
LSWR Brake Van Part 3
 This is a snapshot of the paper kit I designed for the Brake van body. (Snapshot is not to scale).
The drawing from the magazine was scanned and reduced to 2mm scale and then the artwork created over the top with reference to colour photos of the prototype. I wonder if the drawing was not quite accurate because the side window above the gate seems more square than that of the prototype.
The parts include internal decoration for the veranda.
The design was ink jet printed onto a sticky backed label sheet. The Epson ink I use is said to hold its colour for 200 years and is unffected by moisture.
Parts are cut out and some applied to postcard quality paper with others being stuck on top for the outside bracing/doors or to the rear for internal decoration as appropriate.
Clearly, butt jonts are used between panels. Glue is a fast setting PVA from UHU.
A felt tip pen of the matching colour is wiped along the seams to cover the white paper edges but this was not possible for the outside bracing, which in a way is acceptable as the definition is better and it could be construed as dust/dirt or light reflection.
To Part 4.
To Part 4.
Tuesday, 16 October 2012
LSWR Brake Van - Part 2

The wheels are of the disk variety whereas the prototype has spoked wheels. Can you spot the difference? No, That is the beauty of 'n' gauge. Small means we can afford for some details to be overlooked. But I have to say not too happy about the centre portion of the buffer beam missing to allow the coupler to move up and down. On this brake van buffer beams are to be LSWR red and the buffer beam deviation will probably show. Funny how some aspects jar the mind. I should be more unhappy about the unrealistic coupler.
To Part 3.
To Part 1.
David
Sunday, 14 October 2012
Happy First Birthday
14/10/2011 was the date I started this blog, so today is the 1st anniversary for this blog, and the seed to building Cliddesden station on the Basingstoke and Alton light railway in N gauge. I would just like to thank you for reading and following our blog.
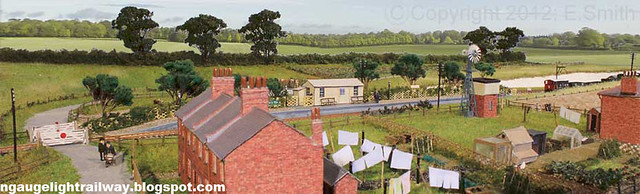
As a present, for you all... The groundwork is pretty much done now, with the last bit finished, being the railway cottage gardens, and all the static grass. Here are a few pictures.

 As was common during the First World War, we have decided to do an open plan "shared" garden with a simple cinder path, and 4 connected allotments, and the railway workers have decided to leave the washing out.
Thanks for your support,
Ed
As a present, for you all... The groundwork is pretty much done now, with the last bit finished, being the railway cottage gardens, and all the static grass. Here are a few pictures.


Thanks for your support,
Ed
Saturday, 13 October 2012
LSWR Brake Van - Part 1

The LSWR Standard Brake Van was featured in 'Railway Modeller' June 1971 with scale drawing, description and photos. A photo of the inaugural train on the line shows this style of van in use.
Nothing available from the trade so a scratch built model will be made. Thankfully, PECO give us a head start with their NR-121B brake chassis kit. The wheelbase is 10' instead of the 10' 6" of the prototype, but we will not worry about 1mm difference in 'n' scale. I'll adjust the wagon body accordingly.
To Part 2
David
Monday, 8 October 2012
Monday is Wash Day

The non-descript. clothing on the left is in fact a scaled down early 1900s photograph of washing on a line. Shame it is too small to show detail, which is quiet interesting showing the fashion of the time, being trousers, stripped long johns and other garments. The trousers on the far left were used to scale the clothes, this being 3' 6" long or 7mm in 'n' gauge.
This line is at the rear of the Station Master's house. There are four more to make for the staff cottages.
David
Monday, 20 August 2012
Colourless Parsley
In previous posts I questioned whether or not the Morrisons dried chopped flat leaf parsley we used for 'n' gauge turnip and tree leaves would hold its green colour over time. Well, it lasted just about two months fading to an off white tone. It looked horrible on the landscape.
The turnip leaves were quickly remedied with dabs of green paint to get it back to the correct pigment shown in this posting. The tress will need to be sprayed green.
David
The turnip leaves were quickly remedied with dabs of green paint to get it back to the correct pigment shown in this posting. The tress will need to be sprayed green.
David
Sunday, 29 July 2012
Rusty Track
A little update... We have started to paint the track a rusty colour, to give it a more weathered, natural look.
 It's a little tricky, as we should really have done it before we laid the track... but we like a challenge.
Ed

Ed
Monday, 23 July 2012
Appeal for Information
The last piece of Cliddesden landscaping to do is the rear gardens of the four terraced station cottages. However, progress is delayed because we don't know the layout of them between 1901 and 1936!
Reading large scale maps of the area suggests the rear gardens were open plan, i.e. no fences or demarcation between but, is this really true? The only fence shown is between the cottages and station master's house.
If you can help us with information about the rear garden layouts of the four cottages between 1901 and 1936 please email sales@amodelrailway.uk or comment on this post below.
Herriard and Bentworth & Lasham station cottage gardens were probably similar so if you know about those that will do for us.
David
Saturday, 7 July 2012
A Sad Event
From Edward Griffiths book, The Basingstoke & Alton Light Railway.
"..in Mr. Vince's time, when the stationmaster was the general factotum, prepared to do anything, he once in 1915 had to wheel a coffin containing the body of a boy who had died in Basingstoke to the village, followed by the sorrowing father."
There is some conflict on dates and position because Martin Dean's book of the same name states he was Office Porter from 07/1916 to 03/1917.
No matter because it fits our period and the scene is begging to be modelled. So, here is Alfred Vince pushing the station barrow with the coffin and the grieving father in tow along station road . Probably on their way to the church in the village.

I have given the father a black tie and bowler hat - common hat at the time, and the porter is in L&SWR uniform. The coffin is child size and in white with a brass plate. The photo was taken from the bedroom window of number 4 station cottages.

In this view we can see the porters brass buttons and a clearer view of the L&SWR luggage barrow. the barrow was made from card and wire except for the wheels. Several failed attempts using wire to make a 10 spoked wheel that is only 4mm diameter. Final solution was to scale a photo of an actual wheel and print out on transparent film. Two stuck back to back for a little more width. Quite pleased with the result and quick to make when you know how.
David
Just a Bit of Fun
Having suggested the idea of modelling Thornycroft and its railway yard off the B&ALR I then found this wondeful aerial photo from the 1920s on the new 'Britain From Above' resource. The shot has been taken from the perfect angle and covers the area of landscape proposed for the model. It will be a key reference should we proceed. In fact, finding something as good as this is tempting fate that it must be done.
Below is an aerial photo of Cliddesden you will not find on 'Britain From Above'.

Below is an aerial photo of Cliddesden you will not find on 'Britain From Above'.

Cliddesden August 1916
David
Wednesday, 4 July 2012
Far and a Field
Laying the turf is almost complete. The bulk of applying the static grass is almost over, just the station workers terraced gardens to consider next.
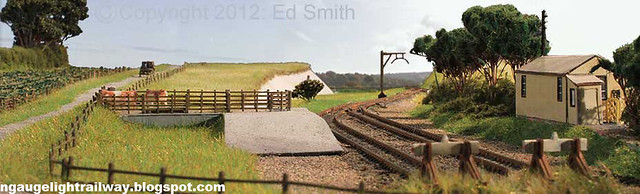
Here's a picture showing the fields at the back of the goods yard, with the turnip field on the right and goods yard bottom right. The field has been put out to pasture, and is looking a little rough from the recent summer dry spell.

We have had to modify the profile of the back fields due to the back siding/ track, the field has had to be made taller so that from viewing height you can't see the train. A hedgerow and trees also increased the height further, but makes the field smaller than what it actually is/ would have been back in 1916. Google street map shows the view today (see below). A handmade post and wire fence lines the whole road and turnip field boundary. Each post is made from cut-up matchsticks, and each one painstakingly drilled by hand with 3 holes, inserted and glued into the board, and then thin wire threaded through.
Let us know what you think.
Ed
Here's a picture showing the fields at the back of the goods yard, with the turnip field on the right and goods yard bottom right. The field has been put out to pasture, and is looking a little rough from the recent summer dry spell.

Google street view
Ed
Sunday, 1 July 2012
N Gauge L&SWR Level Crossing Gates
 This gate is based on that first installed by the L&SWR at Cliddesden. (Later, in Southern Railway days, the gate was changed to the SR style, characterised by two crossing braces whereas the L&SWR used two diagonals).
We could not find a set of L&SWR gates from the trade, even if there was one the chances are it would not fit our gap! So, it is scratch built from balsa wood. I set out with the plan to fit six bars as the prototype, but I was so focused on getting the 4 foot height correct that I forgot the sixth bar and ended up with five. After the job was done I discovered I was working to the wrong height anyway! It should be 5 foot not 4 foot. (An extra 2mm at this scale, which would need the sixth bar. Perhaps I'll remake it when I have a few hours spare.)
 The gate is glued to the concrete coloured post, which is long enough to pass through the baseboard. The ink tube from a ballpoint pen is installed in the baseboard and the gate post inserted into it thus allowing the assembly to swivel open and closed by hand.
David
Wednesday, 27 June 2012
Hedgerow and Turnips
 To the rear are two fields. Root crops were common, except a report from the 1930s cited the station "surrounded by bean fields".
This field is planted with turnips. The field has much less depth than the prototype. Ordinarily, we might have let the field run off the edge of the baseboard to give impression of it being deeper but a hedgerow was needed to further hide trains in the rear siding come fiddle yard.
The hedgerow was made following a technique used by Barry Norman on Petherick etc. and that is a green matted plate scourer about 5mm thick for the sturdy core and covered in Woodland Scenics matting for branches and leaves.
The tress (actually two there) are sprigs of dead sedum flower heads grouped into tree like form. The resulting tree is then upturned and dunked in a mix of green water based paint and PVA glue with a few drops of washing up liquid, shaken off and Morrisons dried flat leaf parsley sprinkled over - very effective, but will it hold its colour over time?
The field was first laid with my own mix of soil. The basis of this being scatter brown dust from Woodland Scenics I think, mixed with other finely sieved scatter materials including sawdust that gives a representation of flint stones common on a chalk landscape.
And so to the turnips. Rows of PVA glue and, yes you guessed it, Morrisons dried flat leaf parsley sprinkled over and left until the glue drys with the excess then being vacuumed off.
David
Saturday, 23 June 2012
Pipe Dream
The end is in sight of completing the scenic landscape of Cliddesden, albeit at least another couple of months spare time modelling. Thoughts turn to what next? In particular how to increase the operating potential and keep our creative minds busy with more modelling. There is scope for this sleepy backwater branch line.
Between Basingstoke and Cliddesden is the famous Thornycroft Motor Works. Railway traffic here gives us the opportunity to run freight trains of gleaming J class lorries destined for use on the battle front of WW1. A G6 locomotive worked between Basingstoke and the works giving us a second locomotive class to run on the line.
Then there are two other stations plus Alton Park for the Lord Mayor Treloar's Hospital at the Alton end of the line.
 This plan (right) sets out how it might be done. It shows Thornycroft and two other stations built as modules the same as Cliddesden and arranged into a square with central operating well - and it is only 8' x 8'!
Alton Park could be accommodated by swapping out the Thornycroft module.
Each module can be set up and operated as a standalone model railway, as Cliddesden is today.
Thornycroft Works
The rear siding is hidden by low relief modelling of the Thornycroft workshops that exist beyond. At the Cliddesden end trains exit the model via the Worting Road bridge. At the Basingstoke end is Deep Lane underpass followed by King Georges playing field and the river Loddon. There can be no doubt that this model is a must have because the works give us a completely different landscape and operational variety.
The hidden siding represents Basingstoke.
Replacing this module with Alton Park gives another quite different scene and operation.
Herriard
Unlike Cliddesden Herriard has a passing loop and semaphore signals for extra interest. Buildings and landscape pretty much mirror Cliddesden.
Bentworth & Lasham
A much longer track plan. The passing loop/head shunt has has had to be significantly shortened to fit. The A339 main road makes it onto the edge of the model.
The hidden siding represents Alton Park & Alton, when the Thornycroft module is used. When Alton Park is used then its hidden siding becomes Alton while Cliddesden's is Thornycroft and Basingstoke.
For us, all this represents about 4 or 5 years spare time modelling. For now it's just a pipe dream.
David
Saturday, 16 June 2012
Mr. Bushnell's Whirligig

Mr. Bushnell, Cliddesden Station Master, had a hobby making whirligigs.
This picture is not as clear as the one in our reference books but look closely (no not the wind pump!) and you will see in front of the tower ladder a tall post with a blob of something on top. In the book we can just make out a four blade propeller attached to the 'blob' but, the animated scene atop the post cannot be identified for sure. The post, by the way, is the trunk from a small tree with the branches cut off.
 I spent ages trying to find a whirligig design that bore some resemblance but to no avail. A search for 'antique whirligig' on Google did throw up some interesting designs and I choose one from the period that was a fairly simple arrangement of objects to scale down to 2mm scale - and here it is on our model railway.
Can you see what it is? Well, it's a woodman sawing a log with a bow saw. Simply printed on two sides of paper. No attempt to cut out the blanks around the detail as the bow saw in particular has very fine lines that would be nigh on impossible to preserve. The white blanks are visible but not here photographed against a white sky.
David
Friday, 1 June 2012
Laying The Turf
Here is an update on the progress of laying down the grass around Cliddesden Station and surrounding area. As mentioned previously the turf is being applied using static grass, this produces a more authentic look. As our model has a lot of turf to lay, it's taking a little longer than other methods. In the end though it's going to look amazing - I'm sure you'll agree...

On the back fill behind the station building we used a mixture of spring and meadow grass from Noch, however we soon realised it was not going to be the right colour for the rest of the layout. As we are trying to model the prototype in the summer, we had to find some "summer grass" and different shades of burnt grass, in 3 different sizes, 2mm, 4mm and 6mm. So a search online revealed war-world.co.uk we found them via ebay, and quickly ordered up 20grams of each size. We first of all laid the bank in front of the platform, starting with 4mm and gradually working upto 6mm by the time we past the end of the platform. This took 5 hours in all just to do that bit, although it looked impressive the block of grass was a little unnatural, we had to find away to break it up bit. As we are modelling a summer scene we felt it was missing some long straw coloured 'dried' grass. War-Worlds unfortunately, don't do long straw like grass. Luckily a visit to a local model railway exhibition sorted that problem. We sprayed some diluted PVA on top of the summer grass and added it in, not sure whether it would work, but were surprised by the great end result. On the bank behind the station we added it in with the summer grass as we went a long, this provided more densely packed 'dried' grass areas. The pictures below give you an overview as to how far we have got, and the different shadings involved. If you look closely you can make out some grass paths and a cricket pitch.


On the back fill behind the station building we used a mixture of spring and meadow grass from Noch, however we soon realised it was not going to be the right colour for the rest of the layout. As we are trying to model the prototype in the summer, we had to find some "summer grass" and different shades of burnt grass, in 3 different sizes, 2mm, 4mm and 6mm. So a search online revealed war-world.co.uk we found them via ebay, and quickly ordered up 20grams of each size. We first of all laid the bank in front of the platform, starting with 4mm and gradually working upto 6mm by the time we past the end of the platform. This took 5 hours in all just to do that bit, although it looked impressive the block of grass was a little unnatural, we had to find away to break it up bit. As we are modelling a summer scene we felt it was missing some long straw coloured 'dried' grass. War-Worlds unfortunately, don't do long straw like grass. Luckily a visit to a local model railway exhibition sorted that problem. We sprayed some diluted PVA on top of the summer grass and added it in, not sure whether it would work, but were surprised by the great end result. On the bank behind the station we added it in with the summer grass as we went a long, this provided more densely packed 'dried' grass areas. The pictures below give you an overview as to how far we have got, and the different shadings involved. If you look closely you can make out some grass paths and a cricket pitch.


There's still a lot more to grass, but it's beginning to pull the model together.

Ed
Friday, 25 May 2012
Blackthorn, Parsley and Chickens
Mr. Bushnell's vegetable plot has been placed to the side of his house. Whether or not this existed for real is unknown but in 1916 food was becoming scarce (there is a war on you know!) and it seems likely that most households were growing vegetables.
The construction uses various scatter and flock materials but wherever possible I try to use real flora. There is nothing better to represent flora on the model railway than the real thing.
First up are rows of cauliflowers. These are in fact the flower buds of a blackthorn tree, dried in the airing cupboard for two days before gluing directly on the model without further treatment. The buds have outer green petals and a tightly enclosed apple green to white core. Caught early in the season just as flowers are opening the buds vary in size and are suitable for 2mm and 4mm scale.
 First time I have tried this so don't know how they will stand the test of time. At the moment they are like hard little bullets. Maybe a coat of matt varnish would seal them from degradation due to moisture ingress and if the colour fades they could be painted over. I have been a bit over zealous with the planting. Two or three rows would be ideal.
Next are rows of potatoes. The earth is heaped up along each row but does not show with these plants fully grown. The core of each plant is a flower from yarrow, collected in autumn when the plant has died to brown. It is trimmed to 4mm tall and glued to the row. This approach gives bulk and height to the plant. The greenery is provided by Morrisons dried flat leaf parsley. It has a good green colour and shape to represent leaves. I also plan to use it on the tree line at the back of the model railway. The yarrow flowers are covered in neat PVA glue and the parsley laid on and sealed over with diluted PVA glue.
 Once again, don't know how the parsley will age but since it was pre-dried by the supplier and still has a strong green colour it may last for ages and could be painted if it fades later.
Finally, the chicken coop and chickens. We know for sure that Mr. Bushnell kept chickens as there is a photo in our reference book. The coop is based on that in another photo from the early 1900s, scanned and enhanced on the computer for printing and forming. The chicken wire for the run is a fine plastic mesh. The chickens are made from cooked Fimo clay. A very small piece is formed into a fat U shape and thin wire pushed into the body for fixing to the model.

David
Wednesday, 16 May 2012
Beatties cement glue
While searching through some boxes of odds and sods, in fact trying to find the rubber stamp characters for the Chalk Cliddesden sign created in the previous post. I came across some Beatties Cement Glue, still with some left in it (but not yet tried/ used). Anyway made me chuckle, and reminded me of my early modelling days. Surely this is an Antique? like the plastic bags reported else where in the blog-o-sphere: phils workbench. Sure it's probably not as old but still a contender...

Ed

Ed
Sunday, 6 May 2012
Chalk and Pens
Chalk
 The station name is picked out in chalk in the flower bed opposite the station building. Mr. Bushnell looks on contemplating when to plant his favourite cornflowers for the summer display.
The letters were cut from the blocks of a rubber stamp printing set, stuck down with superglue and over painted in white.
Pens
Due to lack of photos we cannot confirm the style of cattle pens used at Cliddesden. A Bentworth & Lasham photo shows a brief glimpse of what might be the side of the pens there and it is possibly round horizontal bars passing through vertical posts - a common arrangement. If we search in Google images for L&SWR cattle pens or dock the majority are model railways with only a few real railway pens and mostly in disrepair! One of these is a nice looking pen at Guildford made from wooden boards fixed to concrete posts. The boards are fixed from the inside of the pen to provide a smooth surface so that the cattle do not hurt themselves. Searching on Ebay revealed the Slater's n gauge line side fencing that would work well, with some minor modification, for our pens based on Guildford. The Slater's kit even comes with a bar gate.
As with the style of fence, the arrangement of fences at Cliddesden is also difficult to identify. A 1911 plan in our reference book is far from clear but an ordnance survey map from the same year suggests two pens with access from the adjoining road rather than the goods yard.
Having made the model it seemed entirely logical that the large pen accessible from the road is the main holding pen whilst the smaller funnel shaped pen would be an interim holding pen used just prior to loading. These two pens would make it easier to move individual cattle through the complex thus avoiding animal distress or stampede. Well, that's my theory anyway.
Inside the large pen is a water trough that is meant for 00 gauge but sized better for n gauge and a little wind blown straw on the ground. No cow pats yet though.
 David
David
Saturday, 5 May 2012
Resources
Students of the Basingstoke and Alton Light Railway can do no better than obtain a copy of the definitive book 'The Basingstoke and Alton Light Railway' by Dean, Robertson and Simmonds (ISBN 0-0534197-0-3). It surveys the line and stations in some detail and covers significant events including the background to business decisions that lead to the opening and closing of the line (twice) during its short life.
Before that book was published another, smaller book of the same name existed, authored by Edward Griffith. This contains a subset of topics and photos reproduced in the later book. However, the difference is that there are more stories, some humorous, about railwaymen life and events along the line.
From a modelling aspect, if some of these real life scenarios can be reproduced in model form then this would really bring the layout to life. At least two events from the book that happened at Cliddesden I have in mind to reproduce on the layout - No, not 'Oh Mr. Porter'.
David
Sunday, 29 April 2012
Grass, trees and bushes at last...
This weekend was spent putting down some of the green stuff (grass, bushes and trees)...
Grass:
The Grass is Gaugemaster (Noch) spring grass mixed 50/50 with a darker meadow grass. Putting a layer of neat PVA glue on the area required for grassing and then using the static applicator made earlier (from a fly swat), gentle shaking and the grass stands up on end, giving a natural look to the grass. You can see it here applied to the backfill behind the platform and station building. excess was gently blown, hoovered and brushed away.

Trees and Bushes:
The trees were made using previously gathered dead natural sedum autumn joy, cut to size and coloured with added flock covering. The bushes were from Woodland Scenics applied with a bit of glue to the platform diamond fencing. The fencing can be seen in parts when looking from the front.

Here's a picture from around 1910 showing the overgrown foliage we based the atmosphere of our scene from. Our model is based around 1916, so the trees have grown considerably compared to the photo.
Ed
Friday, 27 April 2012
Pear's Soap & Lipton's Tea
Take a look at this photo of Cliddesden Station. A sharper image appears in "The Book"*.
The Pear's advertising sign is clearly visible but what do the words say above the Pears name and what colour is the sign? A few letters can be discerned in the book photo but not enough to identify the words. A quick search on the web revealed this image of a near identical sign. It gives us the colour and shows the slogan "Matchless for the complexion". Comparing to the letters we can read in the book it is a match.
Mr. Bushnell (Station Master) is obscuring a second sign that can be seen in the book. The first letter is S and the second and third could be UN. Unfortunately I have not identified this sign. It could be Sunlight Soap but it does not match the style of sunlight adverts and I doubt two competitor products would appear on the same fence.
I'd like to put a sign there so, a look at Bentworth & Lasham in the book shows a Lipton's Tea sign. This time some words of the slogan can be read, being 'sales in the world'. Another search on the web completed the slogan for me as "Largest sales in the world" and the colour scheme is white on green.
These searches also revealed the signs date back to about 1910, which correlates with the L&SWR period photos in the book and the layout we are building.
Both model signs were created in MS Word but the font size could not be set small enough for 'n' gauge. Fortunately, my printer can scale. A transparent plastic film was stuck to the signs to represent the shiny enamel finish.
After all that research the slogans on the models can only be read with the aid of a magnifying glass!
 David
David
* The Basingstoke & Alton Light Railway" Martin Dean et al.
Wednesday, 11 April 2012
More DIY 2mm scale people

In this scene three volunteers are following the reaper during harvest to make the wheat stooks. This period video shows very well how it was done. One women is aligning the bundles, another has picked up two bundles and waits for the third who is about to pick up another and together they will make the stook. Their clothing is representative of 1916 being plain colours of black brown, beige and white. Styles are based on those seen in this video.
---------------------------------------------------------------------------------------------------------------

He is in the uniform of the period wearing a frock coat and cap. Note the gold braid and badge on his cap and his characteristic grey beard.
For information on how these models are made see Part 1. However, models shown in this posting differ in so far as they have properly formed shoes, made like the hands, and one shoe has an extended wire for fixing the model into the ground. 0.5mm wire is used for the women's legs instead of 0.7mm.
David
Tuesday, 10 April 2012
Lunchbox Controller

On the side is the locomotive power control knob and direction switch. Cables exit the rear with a long umbilical plugging into the baseboard, thus enabling the operator to move around all sides of the layout with lunchbox in hand! Two power leads also connect at the rear for the 15V (turnout control) and 9v (power control) DC bricks.
The big round button on top is in fact the top of a power transistor for the turnout circuit that did not quite fit in the depth of the box.
This compact arrangement is comfortable, dare I say ergonomic, to handle in operation.(No room for sandwiches though).
David
Subscribe to:
Posts (Atom)